Category Archives: Bulk Fiber Cables

Armored Fiber Cable for Fiber Link Protection

With build-in metal armor inside the outer jacket, armored fiber cable provides extra protection for fiber optic cables. And this is how it distinguishes from standard optical fibers. Therefore, armored fiber cable is more robust and reliable when encountered with rodent, moisture and other issues that may cause damage. Since failures in fiber links can result in an assortment of problems and losses, it is imperative to secure your network with the durable armored fiber cable.

Structures of Armored fiber Cable

Designed with light weight and durable material, the armored fiber cable is proved to be a rodent, cost-effective and flexible alternative to protect the fragile fiber links. Armored fiber cable comes in an array of types in regard to various applications (indoor, outdoor, indoor/outdoor), therefore the structures of one usually differ from another. I’d like to illustrate the structure of indoor armored fiber cable here, to explain the basic construction of common armored cable.

armored fiber cable structure

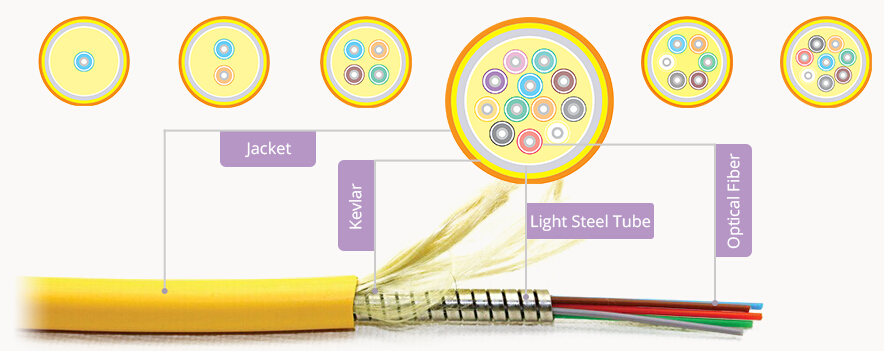
Inferring from the picture below, we can see a light steel tube between the optic fibers and the outer jacket, which offers better protection to the fibers in the center. And the Kevlar is placed inside the outer jacket to cover the steel tube. This picture simply demonstrates the most basic structure of armored cable, and it changes according to different usage occasion.

How to Adopt Armored fiber Cable for Indoor Applications?

Generally, three types of armored fiber cable are often employed for indoor applications, including armored patch cables, armored trunks and armored bulk cables. The use of each in different conditions will be explained in the following.

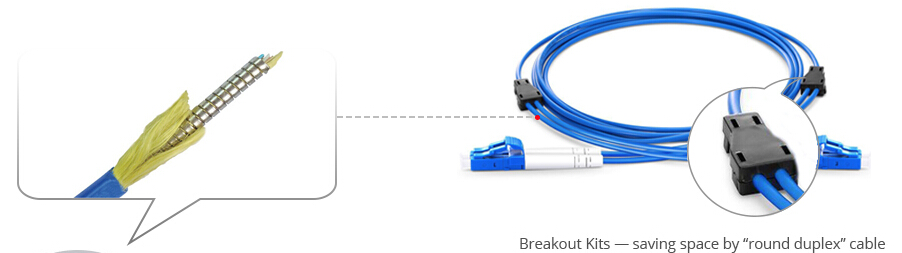
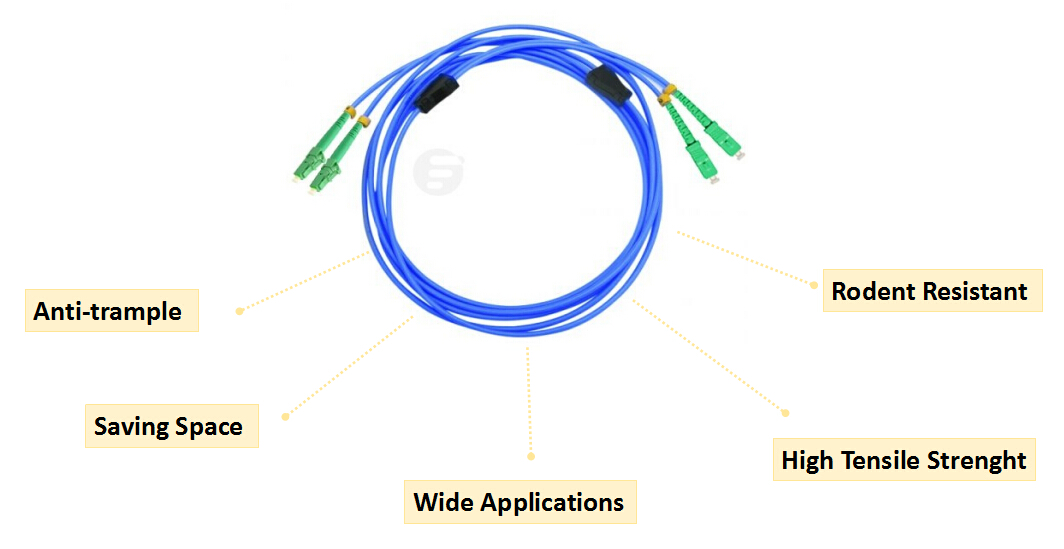
Armored fiber patch cable is widely found in data centers, server rooms and other cabling environments, providing strong and flexible fiber link between devices. Although it is much stronger, armored fiber patch cable is actually as flexible as standard fiber patch cable, and it can be bending randomly without being broken. Armored fiber patch cable can protect the cable from damage caused by twist, pressure or rodent bite, which ensures excellent operation of the network. Installation procedure and maintenance are also easy.

armored fiber patch cable

Armored breakout trunks are used extensively in cable trays and riser shafts-connecting to the horizontal cross-connect or the telecommunications closet. Use of pre-terminated trunks eliminates the need for field termination, thus dramatically shortening installation time and reducing end-user office downtime. Armored breakout trunks are especially suitable for high-speed and high-density network within limited spaces. They are available with various types of connectors, fiber counts (4,6,8 or 12 fibers) and cable rating (Riser OFCR, Plenum OFCP).

armored breakout trunk cable

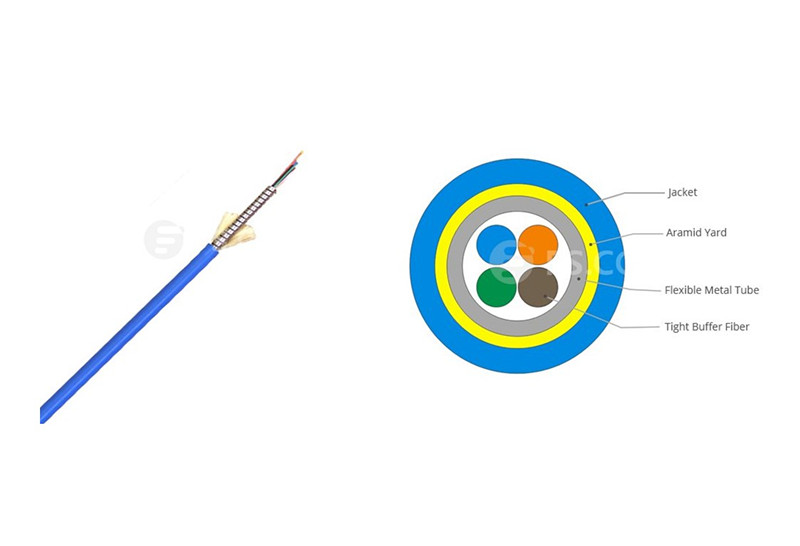
We basically know that armored bulk cable is commonly applied to indoor, indoor/outdoor and outdoor applications. As for light armored fiber cable which features light weight and great flexibility, it shares much popularity for indoor use. With the prevalence of FTTx, there is a fast growing demand for installing indoor optical cables between and inside buildings. Indoor armored fiber cable is less sensitive to temperature and mechanical stress which offers an ideal choice for direct connectorization. Moreover, it can be used in harsh environments without adding extra protection. Apparently, armored fiber cable provides an efficient solution for all fiber cable problems such as twist, pressure and rodent damage.

armored fiber cable for indoor use

Conclusion

Armored fiber cable provides an optimum alternative to secure your network-by protecting fiber links that exposed to mechanical or environmental damage under normal operating conditions. When selecting the right one for your specific need, take fiber count, fiber type, cable riser as well as termination types into account. For more armored fiber cable tutorial and custom information, visit www.fs.com.

Methods of ADSS Optical Cable Installation

ADSS optical cable, short for all dielectric self-supporting cable, is a type of optical fiber that is strong enough to support itself between structures without using conductive metal elements. Designed with excellent tensile and crush performance that impervious to ice, wind, moisture, corrosion and electromagnetic interference (EMI), it is recommended for harsher environments, aerial or direct burial applications near high-voltage power distribution lines. Regarding the complexity and significance of ADSS optical cable installation, we typically offer some practical information from two aspects: general installation methods and safety considerations.

ADSS optical cable

ADSS Optical Cable Installation Methods

Let’s start this section with the principal question: how to efficiently install ADSS optical cable? Generally, there are two primary methods used for installing ADSS optical cable. The first method is called the stationary reel, or the “Stationary Reel Method,” and the second is called the moving reel, or the “Drive-off Method.”

ADSS Installation with Drive-off Method

The drive-off method (the moving reel) is the simplest way to install ADSS optical cable. This method of cable placement is primarily used during the construction of new lines where there is a clear right-of-way and with no obstructions to vehicles. Here we offer some tips for installing ADSS optical cable with this method.

ADSS optical cable installation using drive-off method

1. Attach the cable to pole-line hardware at the first pole of the cable run. Leave enough excess cable to facilitate splicing. The cable should be able to reach the ground, enter a splicing trailer/truck and be placed in an enclosure.

2. For the cable length, always leave more rather than less. Cap the open cable end to prevent contamination from dirt or moisture. Coil the cable being careful not to exceed the minimum bend radius and tie the loop to the top of the pole.

3. Ground and bond the armor at the first pole. The armor is contacted by means of a clamp (sometimes called “shark jaws”) that pierces the jacket to reach the armor.

4. Cable blocks should be installed at all poles not framed in dead-end hardware configurations. Pay the cable off the top of the reel and manually place it into the cable block. Continue to pay-off the cable slowly and uniformly to keep the pulling tension even.

5. Lift the cable from the cable blocks and place it into the suspension clamp once the cable route has been tensioned as required. Tension the cable wherever there are dead end hardware configurations. Ground and bond the armor at these locations once the cable is tensioned.

ADSS Installation with Stationary Reel Method

The stationary reel method typically contains three steps, which are explained below for your reference.

Step One: Trailer Set-Up

The trailer should be positioned in-line with the strand and twice the distance of the set-up chute to the ground from the chute. This prevents the cable from rubbing on the pole (or reel) or binding on the chute. If the trailer cannot be positioned there, move the set-up chute and cable trailer to an adjacent pole.

The cable should pay-off the top of the cable reel. The pay-off of the cable from the reel should cause a downward force at the hitch of the trailer.

Chock the trailer wheels. Adjust the reel brakes as needed. Place protective barriers and cones as needed to protect pedestrians.

ADSS optical cable installation with stationary reel method

Step Two: Pulling Set-Up

Attach the correct-sized cable grip. Then attach a swivel and a pulling line to the grip. Attention should be given to the tension that is being placed on the cable. There is not a practical method to monitor the tension in the cable itself.

Step Three: Cable Block Placement

Use cable blocks designed to be attached directly to the pole hardware. Pull the cable out along the pole line and lift it into the cable blocks with a cable lifter or by hand from a bucket truck.

Safety Considerations for ADSS Optical Cable Installation

Along with the right installation methods for ADSS optical cable, there is another factor that we can never neglect: safety. For each and every cable installer, especially those work for outside plant construction, personal safety is always prior to all. Hence, in this section let’s discuss some basic safety precautions applicable to ADSS optical cable installations.

Point One: Use protective leather gloves when climbing or descending a pole, and when working with sharp instruments. Wear rubber gloves when working near exposed electrical circuits.

Point Two: Use a safety harness on all bucket trunks and aerial lifts. A body belt and safety strap for the bucket or platform must be used when the equipment is in operation to minimize the chance of injury.

Point Three: Carefully inspect the cable reels for any imperfections that might cause damage to the cable. A “figure-eight” configuration should be used when the cable is removed from the reel and piled on the ground. Remember to protect cable with barricades or cones when placing it on pavement or other surfaces.

laying down a cable in figure eight configuration

Point Four: The transmission characteristics of ADSS optical cable can be degraded when subject to excessive pulling force, sharp bends and crushing forces. So keep the maximum pulling tension and span tension in mind, as well as the minimum bend radius.

Point Five: Temporary or permanent guys should be installed at any location where the self-supporting cable is tensioned, in order to avoid placing an unbalanced load on the support poles.

Conclusion

ADSS optical cable installation can be rather complicated since it is partly influenced by local conditions and environments. Do remember to take your safety as a priority before working on the installation task. The methods described for installation of ADSS cable in this article are intended to be used as guidelines, moreover, the specific circumstances, existing engineering and customer requirements should as well be taken into account.